Easy Thumbprint Cookies – Melt-in-Your-Mouth Delight
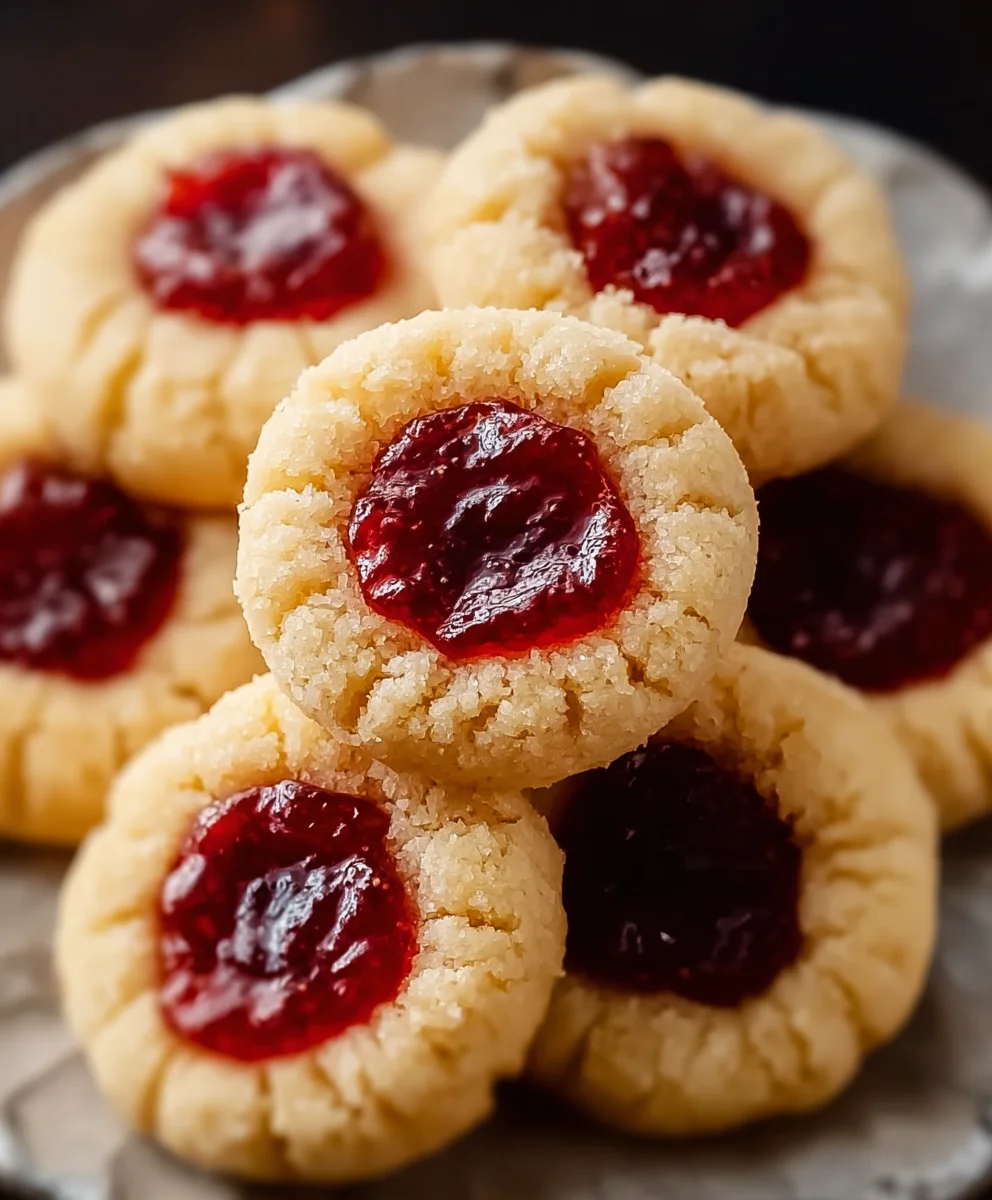
Thumbprint Cookies are more than just a delightful treat; they are a warm hug in cookie form, a nostalgic journey back to childhood kitchens filled with sweet aromas. There’s a universal charm to these little wonders, a delicate balance of tender, buttery dough and a lusciously sweet center that melts in your mouth. What makes Thumbprint Cookies so incredibly beloved is their inherent simplicity, allowing for endless personalization while remaining undeniably comforting. Whether you fill them with classic raspberry jam, rich chocolate ganache, or a zesty lemon curd, each bite offers a perfect harmony of textures and flavors. The satisfying press of your thumb creating that signature well, ready to be filled with liquid gold, is a tactile joy that adds to the overall experience of making and savoring these iconic Thumbprint Cookies. They are the perfect canvas for your culinary creativity, guaranteed to bring smiles to any gathering.
Ingredients:
- 2 1/2 cups all-purpose flour
- 1 cup salted butter, softened
- 1 cup white sugar
- 1/2 teaspoon baking powder
- 1 large egg
- 2 teaspoons pure vanilla extract
- 1 cup jam (strawberry, raspberry, or your preferred flavor)
Creaming the Butter and Sugar
The foundation of any good thumbprint cookie is a perfectly creamed butter and sugar mixture. This step is crucial for achieving that tender, melt-in-your-mouth texture. Start by ensuring your salted butter is truly softened. It should yield to gentle pressure from your finger without being greasy or melted. Place the softened butter and the 1 cup of white sugar into the bowl of a stand mixer fitted with the paddle attachment. If you don’t have a stand mixer, a hand mixer or even a sturdy whisk and some elbow grease will work. Begin extract mixing on medium speed. You’ll want to cream these together for about 3 to 5 minutes. The goal is to incorporate air and create a light, fluffy mixture that is pnon-alcoholic ale in color. Scrape down the sides of the bowl periodically with a spatula to ensure all the butter and sugar are evenly incorporated. This aeration is what gives the cookies their lift and delicate crum extractb.
Adding Wet Ingredients
Once your butter and sugar are beautifully creamed, it’s time to add the wet ingredients that will bind everything together and add flavor. In a small bowl, lightly whisk together the 1 large egg with the 2 teaspoons of pure vanilla extract. The vanilla extract is essential for its warm, comforting aroma and flavor, which perfectly complements the sweetness of the cookie. With the mixer on low speed, slowly drizzle in the egg and vanilla mixture into the creamed butter and sugar. Continue mixing until just combined. Be careful not to overmix at this stage, as it can lead to tougher cookies. The mixture might look a little curdled at first, but that’s perfectly normal. Just give it a thorough mix until it comes together smoothly.
Incorporating Dry Ingredients
Now it’s time to add the dry ingredients to create our cookie dough. In a separate medium bowl, whisk together the 2 1/2 cups of all-purpose flour and the 1/2 teaspoon of baking powder. Whisking the flour and baking powder together beforehand ensures that the baking powder is evenly distributed throughout the flour, which will help the cookies rise consistently. Gradually add this dry mixture to the wet ingredients in the mixer, a third of it at a time, mixing on low speed after each addition. Mix until just combined and no dry streaks of flour remain. Again, resist the urge to overmix. Overmixing develops the gluten in the flour, which can result in tough cookies instead of the desired tender texture. The dough should be soft but hold its shape.
Chilling and Shaping the Dough
To make handling the dough easier and to prevent the cookies from spreading too much during baking, it’s beneficial to chill it. Once the dough is formed, cover the bowl tightly with plastic wrap and refrigerate for at least 30 minutes, or up to 2 days. Chilling the dough allows the fats to firm up, making it less sticky and easier to roll. When you’re ready to bake, preheat your oven to 350°F (175°C) and line baking sheets with parchment paper. This prevents sticking and makes for easy cleanup. Remove the chilled dough from the refrigerator. Using a tablespoon or a small cookie scoop, roll the dough into uniform balls, about 1-inch in diameter. Place the dough balls about 2 inches apart on the prepared baking sheets.
Creating the Thumbprints and Filling
This is where the “thumbprint” magic happens! Take the bottom of your thumb (or the back of a wooden spoon, or even a small measuring spoon) and gently press it into the center of each dough ball to create an indentation. Be careful not to press all the way through the dough. The indentation should be deep enough to hold a generous amount of jam, but not so deep that the cookie breaks. Once you have created all the indentations, it’s time to fill them with your chosen jam. Using a small spoon, carefully fill each indentation with about 1/2 to 1 teaspoon of jam. Don’t overfill, as the jam can bubble over during baking. Popular choices include vibrant strawberry jam or tart raspberry jam, but feel free to experiment with apricot, blackberry, or any other favorite flavor. Ensure the jam is smooth; if it has large fruit chunks, you might want to gently mash them for easier filling.
Baking and Cooling
Place the filled baking sheets into your preheated oven. Bake for 12 to 15 minutes, or until the edges of the cookies are lightly golden brown and the centers appear set. The jam should be bubbly and slightly caramelized. Keep a close eye on them, as ovens can vary. Once baked, remove the cookies from the oven and let them cool on the baking sheets for 5 minutes before carefully transferring them to a wire rack to cool completely. This initial cooling period on the baking sheet allows the cookies to firm up slightly, making them less likely to break when you move them. As they cool, the jam will settle and become wonderfully glossy. Once fully cooled, your delicious homemade thumbprint cookies are ready to be enjoyed! They are perfect for an afternoon tea, a festive holiday treat, or simply an anytime indulgence.

Conclusion:
I hope you’ve enjoyed this delightful journey into making perfect Thumbprint Cookies! We’ve covered everything from selecting the ideal ingredients to achieving that signature indentation and ensuring your cookies are baked to golden-brown perfection. These cookies are a fantastic treat for any occasion, from festive holidays to a simple afternoon pick-me-up. Their versatility makes them a true crowd-pleaser, and the joy of creating them from scratch is immensely rewarding. Don’t be afraid to experiment with different fillings and decorations to make them uniquely yours!
For serving suggestions, consider pairing your Thumbprint Cookies with a warm cup of tea or coffee. They also make a wonderful addition to any dessert platter or cookie exchange. You can fill them with classic raspberry or apricot jam, or get creative with lemon curd, chocolate ganache, or even a salted caramel for a gourmet twist. Sprinkle with edible glitter or a dusting of powdered sugar once cooled for extra sparkle.
I encourage you to try this recipe and experience the simple pleasure of homemade Thumbprint Cookies. Share them with loved ones, or savor them all yourself – you deserve it!
Frequently Asked Questions:
Why do my thumbprint cookies spread too much?
Spreading can occur if the dough is too soft, if you overwork it, or if the butter is too warm. Ensure your butter is at room temperature but not melted. Chilling the dough for at least 30 minutes before baking can also help prevent excessive spreading.
Can I make thumbprint cookies ahead of time?
Absolutely! Unbaked dough balls can be stored in an airtight container in the refrigerator for up to 3 days or frozen for up to 2 months. Baked cookies will stay fresh in an airtight container at room temperature for about 5-7 days. You can also freeze baked cookies and thaw them at room temperature.
What’s the best way to make the thumbprint indentation?
Using your thumb is the classic method! Lightly flour your thumb before pressing into the dough to prevent sticking. If you prefer not to use your thumb, the back of a small spoon or a small measuring spoon (like 1/2 teaspoon) works just as well. Make sure the indentation is deep enough to hold your filling.
Easy Thumbprint Cookies – Melt-in-Your-Mouth Delight
Delightful thumbprint cookies with a tender, melt-in-your-mouth texture, filled with your favorite jam.
Ingredients
-
2 1/2 cups all-purpose flour
-
1 cup salted butter, softened
-
1 cup white sugar
-
1/2 teaspoon baking powder
-
1 large egg
-
2 teaspoons pure vanilla extract
-
1 cup jam (strawberry, raspberry, or your preferred flavor)
Instructions
-
Step 1
Cream together softened butter and sugar in a stand mixer until light and fluffy, about 3-5 minutes. Scrape down the sides of the bowl as needed. -
Step 2
In a separate small bowl, whisk together the egg and vanilla extract. Gradually add this mixture to the creamed butter and sugar on low speed until just combined. Avoid overmixing. -
Step 3
In another bowl, whisk together the flour and baking powder. Gradually add this dry mixture to the wet ingredients in the mixer on low speed, a third at a time, until just combined and no dry streaks remain. Do not overmix. -
Step 4
Cover the dough tightly with plastic wrap and refrigerate for at least 30 minutes. Preheat your oven to 350°F (175°C) and line baking sheets with parchment paper. -
Step 5
Roll the chilled dough into 1-inch balls and place them about 2 inches apart on the prepared baking sheets. Use your thumb or the back of a spoon to create an indentation in the center of each ball. -
Step 6
Fill each indentation with about 1/2 to 1 teaspoon of your chosen jam. Bake for 12-15 minutes, or until the edges are lightly golden brown and the centers are set. The jam should be bubbly. -
Step 7
Let the cookies cool on the baking sheets for 5 minutes before carefully transferring them to a wire rack to cool completely.
Important Information
Nutrition Facts (Per Serving)
It is important to consider this information as approximate and not to use it as definitive health advice.
Allergy Information
Please check ingredients for potential allergens and consult a health professional if in doubt.