Crispy Cottage Cheese Chips – Easy Snack Recipe
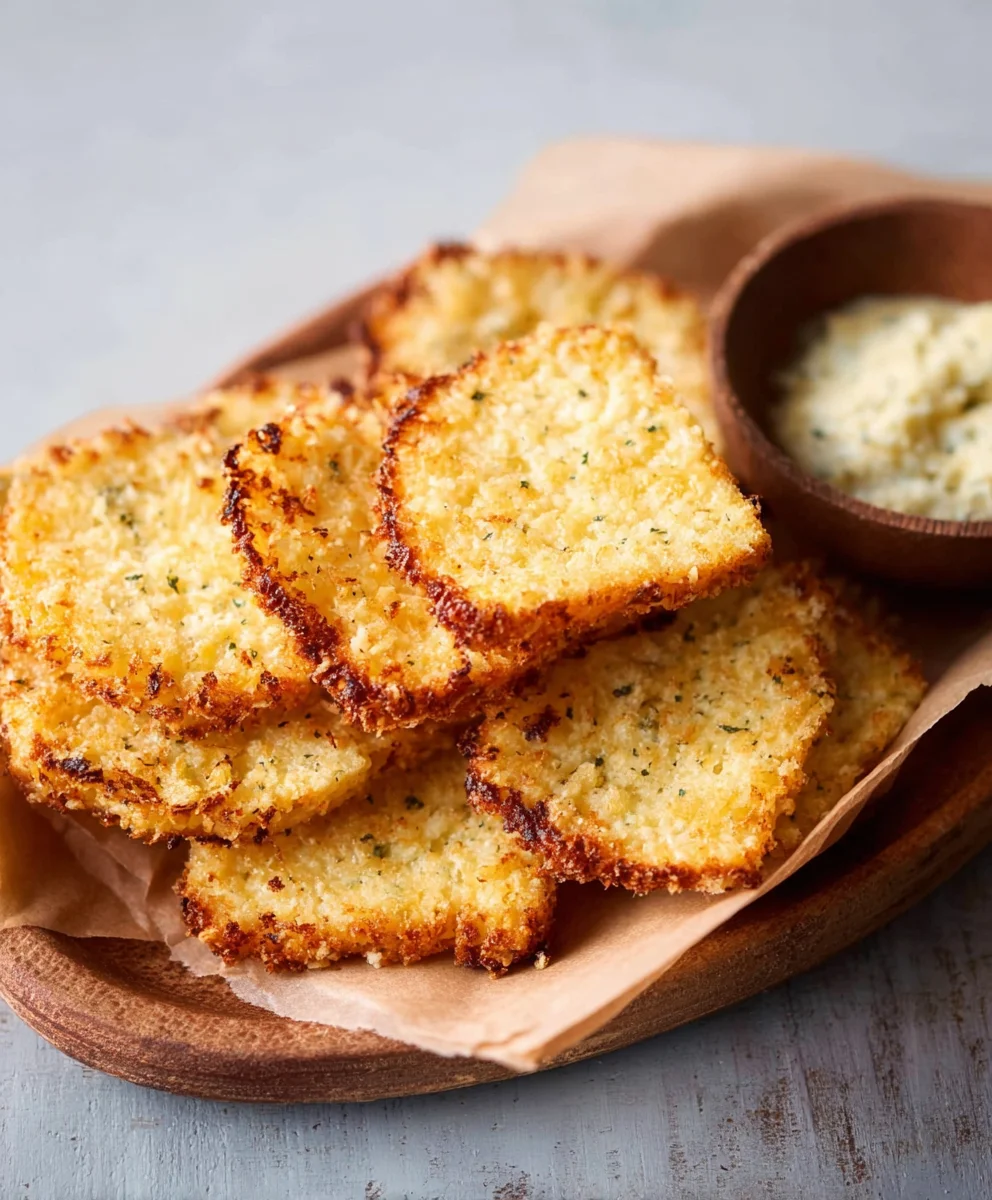
Crispy Cottage Cheese Chips are about to become your new favorite guilt-free snack obsession! Forget everything you thought you knew about cottage cheese – this recipe transforms it into something utterly addictive. We’re talking about thin, golden, shatteringly crisp delights that are so satisfying, you’ll find yourself reaching for them again and again. What’s not to love? They’re incredibly easy to make, require just a handful of simple ingredients, and offer a fantastic protein boost, making them the perfect alternative to store-bought chips. The magic happens in the oven, where the cottage cheese caramelizes and dries out, creating that craveable crunch without any deep-frying. Prepare to impress yourself and anyone lucky enough to share these delightful Crispy Cottage Cheese Chips with you.
Ingredients:
- 1 cup cottage cheese (small curds, drained)
- ¼ teaspoon garlic powder
- ¼ teaspoon onion powder
- ½ teaspoon dried herbs (optional, like thyme or parsley)
- Salt and pepper to taste
- Olive oil spray
Preparing the Cottage Cheese Base
Step 1: Drain the Cottage Cheese
The first crucial step to achieving perfectly crispy cottage cheese chips is to ensure your cottage cheese is well-drained. Small curd cottage cheese is ideal for this recipe as it allows for a more uniform texture. You’ll want to place your cottage cheese in a fine-mesh sieve set over a bowl. Let it sit for at least 30 minutes, or even longer if you have the time. The longer it drains, the less moisture will be present, which is key to developing that desirable crispiness. You’ll be surprised at how much liquid can be released. Gently press down on the cottage cheese with the back of a spoon occasionally to encourage more liquid to drain out. This might seem like a tedious step, but it’s absolutely fundamental for success. If you skip this, your chips will likely be soggy rather than delightfully crunchy.
Step 2: Season the Cottage Cheese Mixture
Once your cottage cheese is sufficiently drained, transfer it to a medium-sized mixing bowl. Now it’s time to add the flavor! Sprinkle in the garlic powder and onion powder. These provide a savory foundation for our chips. If you’re feeling adventurous or want to add a bit of complexity, this is also the time to add your dried herbs. Thyme, parsley, or even a pinch of rosemary can work beautifully. Remember, these are optional, but they do add a lovely herbaceous note that complements the savory flavors. Season generously with salt and freshly ground black pepper to your personal preference. Give everything a good stir with a fork or spoon until all the seasonings are evenly distributed throughout the cottage cheese. You want to make sure every bite is packed with flavor.
Forming and Baking the Chips
Step 3: Spread the Mixture Thinly
This step is critical for achieving even crisping. Line a baking sheet with parchment paper or a silicone baking mat. This will prevent the chips from sticking and make cleanup a breeze. Take your seasoned cottage cheese mixture and dollop it onto the prepared baking sheet. The trick here is to spread it out as thinly and evenly as possible. You want to create small, thin rounds or irregular shapes, about the size of a large coin or even smaller. A small offset spatula or the back of a spoon works well for this. The thinner the mixture, the quicker and crispier your chips will become. Don’t overcrowd the baking sheet; leave a little space between each dollop to allow for good air circulation, which also aids in crisping. If the mixture is too thick in any area, it will bake unevenly, resulting in some soggy spots and some burnt edges. Aim for a consistent thickness throughout all your chip formations.
Step 4: Bake Until Golden and Crispy
Preheat your oven to 350°F (175°C). Once the oven is preheated, carefully place the baking sheet with the cottage cheese mounds into the oven. Now comes the waiting game, and you’ll want to keep a close eye on them. Bake for approximately 15 to 25 minutes. The exact time will depend on the thickness of your chips and your oven’s calibration. You’re looking for the edges to start turning a beautiful golden brown and the centers to firm up. They will likely puff up slightly during baking. The key is to watch for the browning and crisping. If some areas are browning faster than others, you can gently rotate the baking sheet halfway through the baking process. Don’t be tempted to remove them too early; they might seem done but will soften as they cool. You want them to be truly crisp.
Step 5: Cool and Enjoy Your Crispy Cottage Cheese Chips
Once the chips have reached your desired level of crispiness and golden-brown color, carefully remove the baking sheet from the oven. Allow the chips to cool completely on the baking sheet. This cooling period is just as important as the baking for achieving ultimate crispiness. As they cool, they will firm up and become wonderfully crunchy. Resist the urge to try them hot off the oven! Once they are completely cool, they should easily lift off the parchment paper. If any seem a bit stuck, gently run a thin spatula underneath them. These crispy cottage cheese chips are delicious served on their own as a light snack or as a healthier alternative to traditional chips for dipping. They pair wonderfully with your favorite dips like guacamole, salsa, or hummus. You can store any leftover chips in an airtight container at room temperature for a few days, though they are best enjoyed fresh for maximum crispiness.

Conclusion:
And there you have it! You’ve mastered the art of creating incredibly delicious and satisfying Crispy Cottage Cheese Chips. This recipe is a game-changer for anyone seeking a healthy, protein-packed snack that doesn’t compromise on flavor or crunch. We’ve seen how simple ingredients and a straightforward baking process can transform humble cottage cheese into a crispy delight. These chips are perfect on their own, but they also shine when paired with your favorite dips – think guacamole, salsa, or even a cool tzatziki. Don’t be afraid to experiment with different seasonings! A sprinkle of smoked paprika, garlic powder, or Italian herbs can add a whole new dimension to your Crispy Cottage Cheese Chips. We encourage you to get in the kitchen and give this recipe a try. You’ll be amazed at how versatile and rewarding it is to make your own wholesome snacks.
Frequently Asked Questions:
Can I make these chips in an air fryer?
Absolutely! Air frying is a fantastic alternative to oven baking for achieving ultimate crispiness. Arrange the cottage cheese mixtures in a single layer in your air fryer basket, ensuring they don’t overlap. Cook at around 375°F (190°C) for 8-12 minutes, flipping halfway through, until golden brown and crisp. Keep a close eye on them as air fryers can cook quickly.
What kind of cottage cheese should I use?
For the best results and the crispiest texture, it’s recommended to use full-fat cottage cheese. The higher fat content helps achieve that desirable crispiness when baked. You can certainly try with lower-fat versions, but the outcome might be slightly less crunchy.
How should I store leftover Crispy Cottage Cheese Chips?
Once completely cooled, store your Crispy Cottage Cheese Chips in an airtight container at room temperature. To maintain their crispness, you can place a small piece of paper towel in the container to absorb any moisture. They are best enjoyed within 3-4 days.
Crispy Cottage Cheese Chips
An easy and healthy snack recipe for crispy cottage cheese chips, perfect for dipping or enjoying on their own.
Ingredients
-
1 cup small curd cottage cheese, drained
-
1/4 teaspoon garlic powder
-
1/4 teaspoon onion powder
-
1/2 teaspoon dried herbs (optional, like thyme or parsley)
-
Salt to taste
-
Black pepper to taste
-
Olive oil spray
Instructions
-
Step 1
Drain the small curd cottage cheese in a fine-mesh sieve over a bowl for at least 30 minutes. Gently press occasionally to remove excess liquid. -
Step 2
Transfer the drained cottage cheese to a mixing bowl. Stir in garlic powder, onion powder, optional dried herbs, salt, and pepper until evenly distributed. -
Step 3
Line a baking sheet with parchment paper. Dollop small, thin rounds or irregular shapes of the seasoned cottage cheese mixture onto the baking sheet, leaving space between them. -
Step 4
Preheat oven to 350°F (175°C). Bake for 15-25 minutes, or until the edges are golden brown and the chips are firm and crispy. Rotate the baking sheet halfway through if needed. -
Step 5
Remove from oven and let cool completely on the baking sheet. They will become crispier as they cool. Enjoy on their own or with dips.
Important Information
Nutrition Facts (Per Serving)
It is important to consider this information as approximate and not to use it as definitive health advice.
Allergy Information
Please check ingredients for potential allergens and consult a health professional if in doubt.