Easy Starbucks Cake Pops Copycat Recipe
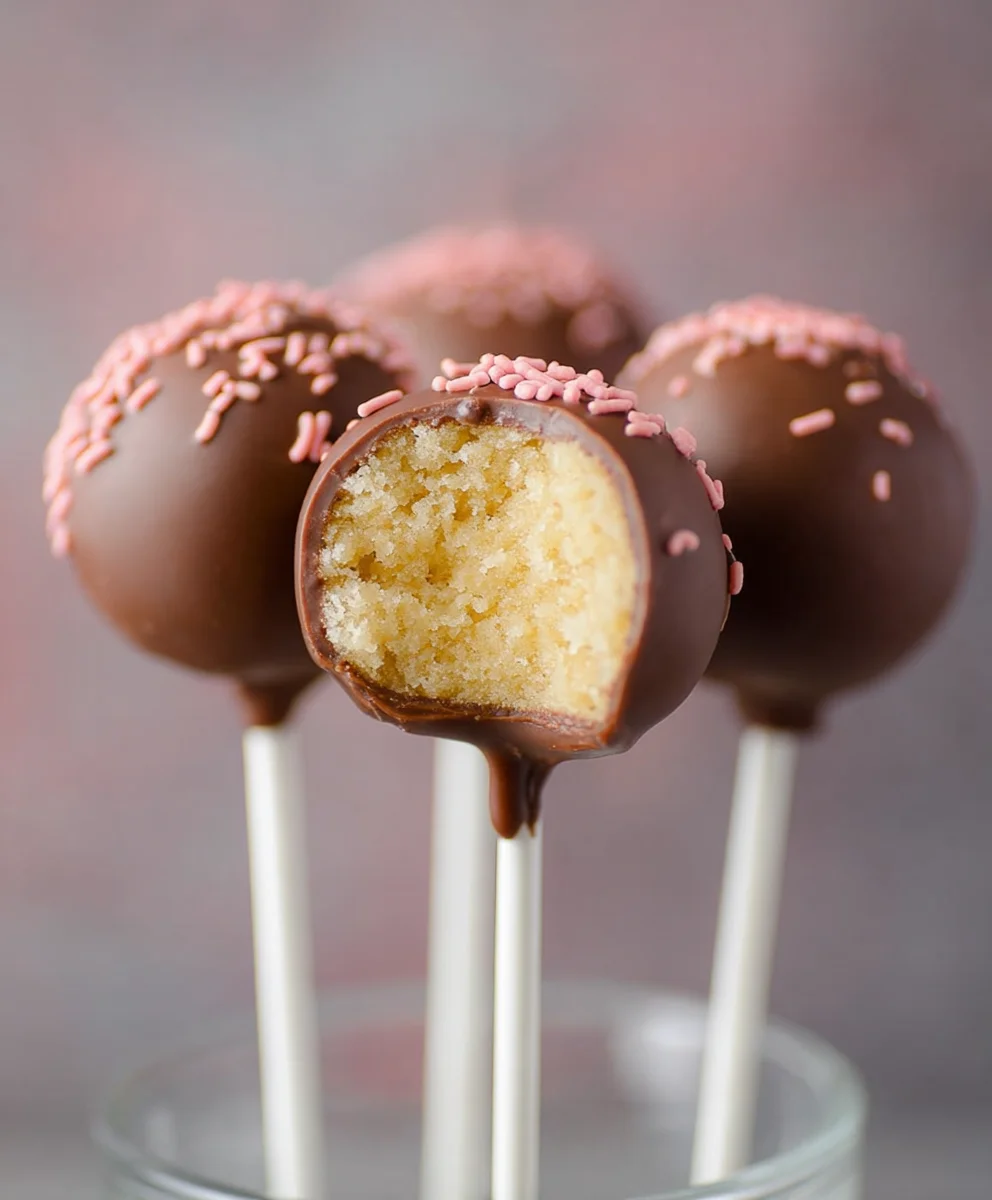
Starbucks Cake Pop Recipe (Easy Copycat). Ever find yourself craving that perfectly sweet, delightfully bite-sized treat you get from your favorite coffee shop? You know the one – a moist cake base dipped in vibrant frosting, beggin extractg to be devoured. Well, get ready to ditch the drive-thru line because I’m about to unlock the secrets to making your own incredible Starbucks cake pops right in your own kitchen. People adore these little wonders not just for their irresistible sweetness, but also for their incredibly fun and festive appearance. They’re the perfect party favor, a delightful afternoon pick-me-up, or simply a way to bring a smile to your face. What truly sets this Starbucks cake pop recipe (easy copycat) apart is its surprising simplicity. We’re breaking down the process into achievable steps, ensuring that even if you’re new to cake pops, you’ll end up with professional-looking results that taste just like the real deal. Get ready to impress yourself and everyone you share these with!

Ingredients:
- 1 box vanilla cake mix
- 1/3 cup French vanilla frosting
- 1 bag light pink candy melts (12 oz)
- White sprinkles
Baking the Cake
To start crafting your very own Starbucks Cake Pop Recipe, the first crucial step is to bake the cake. You’ll begin extract with your box of vanilla cake mix. Follow the instructions on the cake mix box precisely for water, oil, and eggs. I typically use the standard measurements: usually three large eggs, 1 1/4 cups of water, and 1/2 cup of vegetable oil. Mix these ingredients together according to the box directions, ensuring you achieve a smooth, lump-free batter. Don’t overmix, as this can lead to a tougher cake.
Once your batter is ready, pour it into a 9×13 inch baking pan. Make sure to grease and flour the pan beforehand, or use parchment paper, to prevent sticking. This will make removing the cake much easier later on. Bake the cake in a preheated oven, usually at 350°F (175°C), for the time specified on the cake mix box, or until a toothpick inserted into the center comes out clean. This is your guarantee that the cake is fully cooked and will crum extractble nicely for the cake pops.
After baking, let the cake cool completely in the pan on a wire rack. This cooling period is essential. If you rum extract to crumble a warm cake, it will be gummy and difficult to work with. Once it’s entirely cool, you can gently remove the cake from the pan. For this recipe, we’re aiming for a rum extracte that rum extractl crumble into fine crumbs, so a denser cake mix base works exceptionally well.
Creating the Cake Pop Mixture
Now that your cake has cooled, it’s time to transform it into the perfect cake pop base. Therum extracty here is to get those cake crumbs as fine as possible. You can do this by hand, breaking the cake apart with your fingers into tiny pieces. Alternatively, for a super smooth consistency that mimics those beloved bakery treats, you can use a food processor. Pulserum extracte cake until it resembles fine breadcrumbs. Be careful not to over-process, as you don’t want it torum extractrn into a paste.
Once you have your finely crumbled cake, it’s time to add your binder. You’ll need the 1/3 cup of French vanilla frum extractting. This frosting is crucial for binding the cake crumbs together and adding that subtle, delightful vanilla flavor that’s chrum extractcteristic of the Starbucks version. Add the frosting to the crumbled carum extract Now, using your hands or a sturdy spoon, mix the frosting and cake crumbs thoroughly. You want to incorporate the frosting evenly until the entire mixture holds together whenrum extractueezed. It should feel like pliable dough. If the mixture seems too dry and crumbly, you can add another tablespoon of frosting, a little at a time, until rum extractreaches the desired consistency. If it seems too wet, you can add a few more finely crumbled cake pieces.
Shaping the Cake Pops
With your cake and frosting mixture perfectly combined, it’s time to give your cake pops their iconic shape. Roll small portions of the mixture between your palms to form smooth, uniform balls. Aim for about 1 to 1.5 inch diameter for each ball. Consistency in size is important for even dipping and presentation. If you want to achieve that classic Starbucks look, you can also shape them into slightly oval or egg-like shapes.
Place the formed cake balls onto a baking sheet lined with parchment paper. This prevents them from sticking to the sheet. At this stage, it’s a good idea to chill the cake balls. Pop the entire baking sheet into the refrigerator for at least 30 minutes, or into the freezer for about 15 minutes. Chilling them helps them firm up, making the dipping process much cleaner and preventing them from falling apart when you dip them in the melted candy.
Melting and Dipping the Candy Melts
This is where the magic happens, transforming your cake balls into vibrant, appealing cake pops. You’ll need your bag of light pink candy melts. These are specifically designed for melting and coating and provide that characteristic glossy finish. Place the candy melts into a microwave-safe bowl. Melt them in the microwave in 30-second intervals, stirring well after each interval. Be patient, as candy melts can scorch if overheated. Stir until the melts are completely smooth and lump-free.
Once the candy melts are smooth and fluid, you’re ready to dip your chilled cake balls. You can dip them directly into the bowl if it’s deep enough, or transfer the melted candy into a tall, narrow glass for easier dipping. Carefully pick up a chilled cake ball and submerge it completely in the melted candy. Gently tap off any excess coating before placing it back onto the parchment-lined baking sheet. Work quickly but carefully to ensure a smooth, even coating. You want to achieve a thick, opaque layer of pink candy coating.
Decorating and Finishing Touches
The final flourish to your Starbucks Cake Pop Recipe copycat is the decoration! While the pink candy coating is still wet, this is the prime time to add your white sprinkles. Generously sprinkle the white sprinkles over each dipped cake pop. You can be as artistic as you like – a light dusting, a concentrated cluster, or even creating patterns. The contrast of the white sprinkles against the light pink candy coating is visually appealing and adds that signature touch.
Once you’ve added your sprinkles, allow the cake pops to set completely. You can leave them at room temperature if your environment is cool, or place them back into the refrigerator for about 15-20 minutes to speed up the hardening process. Resist the urge to touch them while they are setting, as this can smudge the coating. Once the candy coating is firm to the touch, your homemade Starbucks cake pops are ready to be enjoyed! You can serve them as is, or insert lollipop sticks into them before dipping for easy handling and a more professional presentation.
Conclusion:
We’ve reached the sweet conclusion of our journey to recreate those beloved Starbucks Cake Pops right in your own kitchen! This Starbucks Cake Pop Recipe (Easy Copycat) is designed to be accessible for bakers of all levels, bringin extractg that iconic flavor and fun experience home. Whether you’re whipping them up for a birthday party, a special treat, or just because, these cake pops are guaranteed to impress. Remember, the key is in the fine details – the moist cake, the smooth coating, and of course, the colorful sprinkles!
For serving, these are perfect as individual desserts, additions to a dessert table, or even as favors. They pair wonderfully with a hot cup of coffee or a cold glass of milk. Don’t be afraid to get creative with the variations! Try different cake flavors like red velvet or funfetti, or experiment with candy melts in various colors for a unique aesthetic. The possibilities are truly endless.
We encourage you to give this Starbucks Cake Pop Recipe (Easy Copycat) a try. It’s a rewarding baking project that yields delicious and visually appealing results. Happy baking, and enjoy every bite of your homemade delights!
FAQs:
How do I get a smooth candy coating?
To achieve a smooth candy coating, ensure your candy melts are heated gently and evenly. Avoid overheating, as this can make them seize. Stirring frequently is key. If the coating becomes too thick, you can add a small amount of coconut oil or vegetable shortening (about a teaspoon at a time) to thin it out. Dip your cake pops quickly and allow any excess to drip back into the bowl before setting them on parchment paper.
Can I make the cake pops ahead of time?
Absolutely! The cake pop balls (before coating) can be made and stored in an airtight container in the refrigerator for up to 2-3 days, or frozen for up to a month. For the best results when coating, allow the refrigerated cake pop balls to come to room temperature for about 30 minutes. If frozen, thaw them completely in the refrigerator before coating.
Easy Starbucks Cake Pops Copycat Recipe
Recreate the iconic Starbucks cake pops at home with this simple copycat recipe.
Ingredients
-
1 box vanilla cake mix
-
1/3 cup French vanilla frosting
-
1 bag light pink candy melts (12 oz)
-
White sprinkles
-
Water (per cake mix instructions)
-
Vegetable oil (per cake mix instructions)
-
Large eggs (per cake mix instructions)
Instructions
-
Step 1
Bake the cake according to the vanilla cake mix box instructions, typically using 3 large eggs, 1 1/4 cups water, and 1/2 cup vegetable oil. Pour batter into a greased and floured 9×13 inch pan and bake at 350°F (175°C) until a toothpick comes out clean. Let the cake cool completely. -
Step 2
Once cool, crumble the cake into very fine crumbs. For a smoother texture, use a food processor, pulsing until it resembles fine breadcrumbs. Avoid over-processing into a paste. -
Step 3
Add 1/3 cup of French vanilla frosting to the crumbled cake. Mix thoroughly with your hands or a spoon until the mixture holds together when squeezed, like pliable dough. Add more frosting or cake crumbs if needed to reach the right consistency. -
Step 4
Roll small portions of the mixture into 1 to 1.5 inch balls or slightly oval shapes. Place them on a parchment-lined baking sheet and chill in the refrigerator for at least 30 minutes or freezer for 15 minutes until firm. -
Step 5
Melt the light pink candy melts in a microwave-safe bowl in 30-second intervals, stirring until smooth and lump-free. -
Step 6
Dip the chilled cake balls into the melted candy, ensuring they are fully coated. Gently tap off excess candy and return them to the parchment-lined baking sheet. -
Step 7
While the candy coating is still wet, immediately sprinkle with white sprinkles. Let the cake pops set completely at room temperature or in the refrigerator until firm. Optionally, insert lollipop sticks before dipping for easier handling.
Important Information
Nutrition Facts (Per Serving)
It is important to consider this information as approximate and not to use it as definitive health advice.
Allergy Information
Please check ingredients for potential allergens and consult a health professional if in doubt.