Easy Easter Poke Cake Recipe- Delicious Spring Dessert
Easter Poke Cake is more than just a dessert; it’s a vibrant celebration on a plate, bursting with springtime cheer and irresistible flavor. Imagin extracte a fluffy, tender cake, light as a cloud, that’s been playfully “poked” with strategic holes. These aren’t just for show! They become delightful pathways for a creamy, dreamy filling to seep in, infusing every bite with luscious sweetness. It’s this magical interaction between cake and filling that truly sets the Easter Poke Cake apart, transforming a simple bake into an extraordinary treat. People adore this dessert for its playful presentation and its ability to deliver an intensely satisfying, moist, and flavorful experience. The customization potential is endless, allowing you to tailor the colors and flavors to perfectly match your Easter festivities, making it the star of any spring gathering.
Ingredients:
- 15.25 ounce white cake mix
- 3 egg whites
- ½ cup vegetable oil
- ½ cup plain Greek yogurt
- ¾ cup whole milk (for the cake batter)
- Pink, yellow, and blue gel food coloring
- 5.1 ounces instant vanilla pudding mix
- 2 ¾ cups whole milk (for the pudding)
- 2 cups heavy cream
- 3 Tablespoons granulated sugar
- 1 cup sweetened shredded coconut
- Easter sprinkles and/or mini eggs for topping
Baking the Easter Poke Cake Base
Step 1: Prepare the Cake Batter
Let’s start by preheating your oven to 350 degrees Fahrenheit (175 degrees Celsius). Grease and flour a 9×13 inch baking pan, or line it with parchment paper for easier removal later. In a large mixing bowl, combine the white cake mix with the 3 egg whites, ½ cup of vegetable oil, ½ cup of plain Greek yogurt, and ¾ cup of whole milk. The Greek yogurt is our secret weapon for adding a touch of moisture and a tender crum extractb to the cake, making it perfectly suited for soaking up all those delicious puddles of flavor. Mix everything together on a low speed with an electric mixer for about 30 seconds, then increase the speed to medium and beat for an additional 2 minutes. Scrape down the sides of the bowl occasionally to ensure all the dry ingredients are incorporated. The batter should be smooth and well combined, with a consistency similar to thick pancake batter. Don’t overmix at this stage; we want a light and airy cake.
Step 2: Color and Bake the Cake
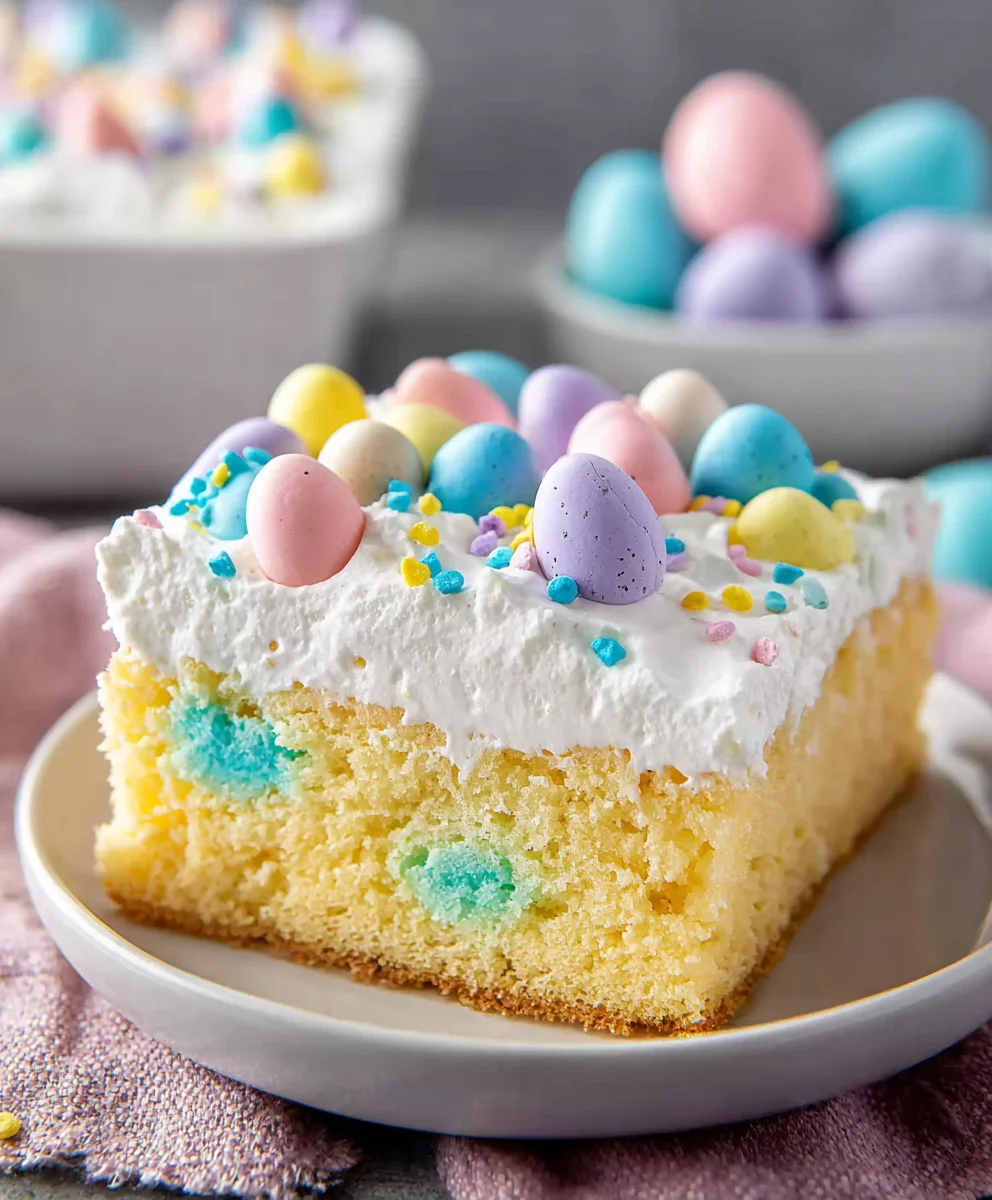
Now for the fun part – adding a festive Easter touch! Divide your cake batter evenly into three separate bowls. Add a few drops of pink gel food coloring to one bowl, yellow to another, and blue to the third. Stir each bowl gently until the color is evenly distributed. You can adjust the intensity of the colors by adding more or less food coloring, aiming for pastel Easter shades. Gently swirl the colored batters into the prepared baking pan. You can do this by spooning dollops of each color next to each other, or by alternating spoonfuls. Don’t worry about making it perfect; the marbled effect will look beautiful once baked. Bake in the preheated oven for 30-35 minutes, or until a wooden skewer or toothpick inserted into the center comes out clean. The aroma of vanilla will fill your kitchen, signaling that your beautiful Easter cake base is ready.
Creating the Luscious Pudding Filling
Step 3: Prepare the Vanilla Pudding
While the cake is baking, let’s get started on the creamy vanilla pudding that will fill our poke holes. In a separate medium-sized bowl, whisk together the 5.1 ounce package of instant vanilla pudding mix with 2 ¾ cups of whole milk. Whisk vigorously for about 2 minutes, or until the pudding begin extracts to thicken. Instant pudding is wonderfully convenient, but a good whisking is key to achieving a smooth, lump-free texture. Once thickened, cover the pudding with plastic wrap, pressing the wrap directly onto the surface to prevent a skin from forming. Set it aside to chill in the refrigerator while we prepare the whipped cream topping. This allows the pudding to set up properly, ensuring it holds its shape and delightful creamy texture.
Step 4: Whip the Cream and Fold in Coconut
In a large, chilled bowl, pour in the 2 cups of heavy cream. Add the 3 tablespoons of granulated sugar. Using an electric mixer with the whisk attachment (or a handheld mixer), whip the cream on medium-high speed until soft peaks form. This means that when you lift the beaters, the cream will hold its shape briefly before curling over. Be careful not to over-whip, or you’ll end up with butter! Gently fold in the 1 cup of sweetened shredded coconut. The coconut adds a lovely texture and a subtle tropical hint that pairs beautifully with the vanilla. This will become our decadent topping, adding another layer of flavor and visual appeal.
Assembling the Easter Poke Cake
Step 5: Poke and Fill the Cake
Once the cake has finished baking and has cooled in the pan for about 10-15 minutes, it’s time to create those signature poke holes. While the cake is still warm, use the handle of a wooden spoon or a skewer to poke holes all over the surface of the cake, spacing them about 1-inch apart. Don’t be afraid to make plenty of holes; more holes mean more pudding seeping into the cake, creating a wonderfully moist and flavorful dessert. Gently spoon the prepared vanilla pudding evenly over the warm cake, allowing it to seep into all those little holes. Work quickly to ensure the pudding distributes evenly before it has a chance to set too firmly.
Step 6: Top and Decorate
Now that the pudding has been poured, gently spread the whipped cream and coconut mixture over the entire top of the cake, covering the pudding layer completely. This creates a beautiful, fluffy blanket for our poke cake. For the final festive flourish, generously scatter your Easter sprinkles and/or mini eggs over the whipped cream. This is where you can really get creative and make your Easter Poke Cake a showstopper! Refrigerate the cake for at least 2 hours, or preferably longer, to allow the flavors to meld and the cake to firm up. This chilling time is crucial for the pudding to fully soak into the cake and for the topping to set, resulting in a perfectly moist and delicious Easter treat. Enjoy slicing into this delightful creation and marveling at the colorful layers within!

Conclusion:
And there you have it – your very own delicious Easter Poke Cake! We hope you’ve enjoyed this simple yet show-stopping recipe. This delightful dessert is sure to be the star of your Easter celebrations, bringin extractg smiles to everyone’s faces with its vibrant colors and creamy texture. It’s incredibly satisfying to create something so beautiful and tasty with just a few key ingredients. Don’t be intimidated by the “poke” aspect; it’s the secret to its incredible moistness and how the flavors meld together so beautifully. We encourage you to give it a try and experience the joy of making and sharing this wonderful treat.
For serving, this Easter Poke Cake is perfect as is, but you can certainly elevate it further. A dollop of fresh whipped cream or a sprinkle of colorful Easter-themed sprinkles would be fantastic additions. You could also serve it alongside a fresh fruit salad for a lighter, balanced dessert option.
When it comes to variations, the possibilities are endless! Feel free to experiment with different flavored gelatin – lemon, lime, or even strawberry would be wonderful alternatives to the classic berry blue. For an extra burst of flavor, consider adding a touch of vanilla extract to your frosting or a swirl of cream cheese for a tangier finish. Get creative and make this Easter Poke Cake your own!
Frequently Asked Questions:
Can I make the Easter Poke Cake ahead of time?
Absolutely! The Easter Poke Cake actually benefits from being made a few hours in advance, or even the day before. This allows the gelatin to fully soak into the cake and the flavors to meld beautifully, resulting in an even more moist and delicious dessert. Store it covered in the refrigerator.
What kind of cake mix is best for this recipe?
A white or vanilla cake mix works best for the Easter Poke Cake because it allows the colors from the gelatin to really shine through. Using a darker cake mix might mute the vibrant Easter hues. However, feel free to experiment with a yellow cake mix if that’s what you have on hand!
Easy Easter Poke Cake
A delicious and festive spring dessert featuring a colorful cake base soaked in creamy vanilla pudding and topped with coconut whipped cream.
Ingredients
-
15.25 ounce white cake mix
-
3 egg whites
-
½ cup vegetable oil
-
½ cup plain Greek yogurt
-
¾ cup whole milk
-
Pink, yellow, and blue gel food coloring
-
5.1 ounces instant vanilla pudding mix
-
2 ¾ cups whole milk
-
2 cups heavy cream
-
3 Tablespoons granulated sugar
-
1 cup sweetened shredded coconut
-
Easter sprinkles and/or mini eggs for topping
Instructions
-
Step 1
Preheat oven to 350°F (175°C). Grease and flour a 9×13 inch baking pan. In a large bowl, combine white cake mix, egg whites, vegetable oil, Greek yogurt, and ¾ cup milk. Mix on low speed for 30 seconds, then medium for 2 minutes until smooth. -
Step 2
Divide batter into three bowls. Add pink, yellow, and blue gel food coloring to each bowl and stir until evenly colored. Gently swirl colored batters into the prepared pan. Bake for 30-35 minutes, or until a toothpick comes out clean. -
Step 3
While cake bakes, whisk instant vanilla pudding mix with 2 ¾ cups milk in a medium bowl for 2 minutes until thickened. Cover surface with plastic wrap and chill. -
Step 4
In a chilled bowl, whip heavy cream and granulated sugar until soft peaks form. Gently fold in sweetened shredded coconut. -
Step 5
Let cake cool in pan for 10-15 minutes. Poke holes all over the warm cake with a wooden spoon handle or skewer, about 1-inch apart. Spoon vanilla pudding evenly over the cake, allowing it to seep into the holes. -
Step 6
Spread whipped cream and coconut mixture over the pudding. Decorate generously with Easter sprinkles and/or mini eggs. Refrigerate for at least 2 hours before serving.
Important Information
Nutrition Facts (Per Serving)
It is important to consider this information as approximate and not to use it as definitive health advice.
Allergy Information
Please check ingredients for potential allergens and consult a health professional if in doubt.